How to draw - Gaara of the sand drawing guide
How to draw guide – learn how to draw
Learn how to draw manga, how to draw cars and how to draw anime from our guides
Gaara of the sand drawing guide
- Author: admin
- Filed under: How to draw anime
 Continuing the series of How to draw Naruto characters, today is time for Gaara of the Desert. We have a quick 6 steps tutorial that should not be too hard for you to understand.
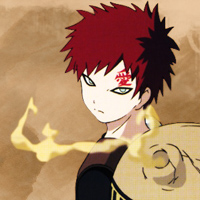
First, take a look at Gaara’s pic from the show (on the right) to know exactly what are we trying to draw here. If you’re interested, you can find more wallpapers and details about Gaara here.
And now, let’s proceed with the guide:
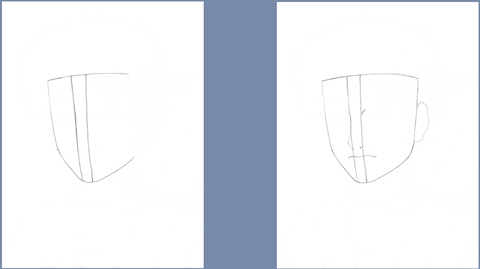
Step 1: Start off by drawing the forehead and the face lines. Make some additional thin guides to help you place face elements later on.
Step 2: Draw the nose and the mouth and continue drawing the face line till it’s completed. Now sketch the ear.

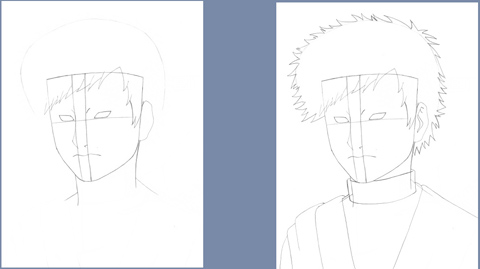
Step 3: Draw two guiding lines: a straight one for the eyes, to make sure they will be at the same level, and a curved one above the head to help you draw Gaara’s hair. Now sketch the eyes and start working on its fringe. Draw the neck lines.
Step 4: Finish the hair and add some details to the ear. Now, start drawing the body and the clothes your character wears.

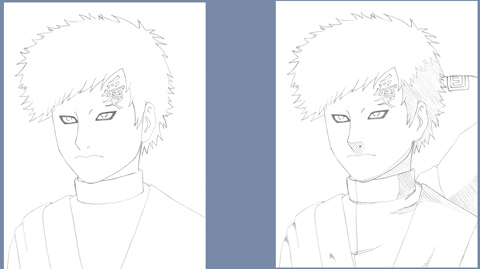
Step 5: Erase all the helping lines. Now, we get to the details. Gaara has two distinctive tattoo marks: a big red sign on his forehead and eyes surrounded by some kind of black make up or something. Make sure you put these in your drawings.
Step 6: Coming to the final step, all you have to do now is add what can be seen of Gaara’s backpack and some shadows.

That was about and now you’ve learned how to draw Gaara fo the Desert. Wasn’t that hard, was it? Now start practicing till you get perfect and stay tuned for our other Naruto characters drawing guides to come.
Please subscribe to my feed or subscribe to the newsletter if you want to stay in touch with the latest drawing tips, guides and videos.


13 Responses for "Gaara of the sand drawing guide"
thankz 4 helping me draw gaara could you send me how to draw other characters. please 🙂
Although my drawing isn’t much like Gaara,thanks anyway.Everything was pretty easy except for the tattoo Gaara has on his forehead…=)
the hair looks a litte big but still good step by step guide
That is good drawing
Dang his tattoo was hard. I decided just to go over a sketch of it in red pen. I found some pictures of the tattoo (larger, clearer) on Google Images.
Well..first I VERY happy,bcause now i can draw gaara face..thANK YoU!
would u please sent me more picture of othercharacter of naruto I mean put some steps just like that :))
OMG those drawings of gaara? that dose not look like him gaara is so much hotter than that
is this a drawing of gaara? it dosent even look like hem gaara is so much hotter than that!!!!
OMG its not MAKE UP !!!!!!!!!!! a true fan ( like myself ) would know that gaara is like that because the shukaku demon inside him would hurt him in his sleep ( or somethin like that ) so he forced himself to stay awake and the black rings formed around his eyes due to lack of sleep !!!
no maria, i’m a true naruto fan. that is makeup. black rings arent like that. i’m gonna lmfao. question: which ep r u at?
. . . its not eyeliner . . .
He’s an insomniac.
He doesn’t sleep.
Much.
So he has shadows.
And the Shukaku is a raccoon. Raccoons have those markings around their eyes. Naruto got his whiskers from the Kyuubi. Makes sense that Gaara gets his shadows from Shukaku, as much as his insomnia..
And he wears a gourd…
the hair comes out too much, but other than that it’s great
Leave a reply on "Gaara of the sand drawing guide"